Import performances
Table of contents
Loading data for a specific area (ctiy, region, even country) can be pretty quick. To do so, multiple optimization has been made to save time but still computing field of views for each camera, depending on surrounding buildings.
If you want to load the entire planet be aware that it will take multiple hours to load and consume a large amount of space on your server, mainly because we need to store a lot of buildings. We strongly advise you to start with small areas and build your way up with bigger files later, to avoid bad surprises.
Performances and optimizations
Multi-processing when loading cameras
When loading cameras into the database, it is possible to use multi-processing to compute faster. By default the install.sh script will detect the number of cores on your machine and use them all for computing.
In details, the command will create multuple process and dispatch to them batches of cameras to handle. This allow to parralelize the work.
When running manually, you can call the load_cameras command with arguments to optimize processing :
| Command argument | Given parameter | Description | Default |
|---|---|---|---|
--batch-size | integer | Number of cameras to process in each batch. | --batch-size 100 |
--max-workers | integer | Number of worker processes to use. Do not go further than you number of cores. Maximum value is 32. | --max-workers 4 |
Keep only necessary buildings
To have a lighter database, only the necessary buildings (close to cameras) are kept to avoid storing potentially millions of unused obects. This offers two advantages:
- Having a lighter database
- Speed up the computation time when computing fields of views of cameras
To know which buildings need to be inserted into the database and which not, we need to know where are the cameras. So before loading the buildings in the database, we first load cameras once. This allow to first compute very quickly the maximum field of view for every camera.
Then, during the building import procedure we use thoses geometries to filter buildings and only keep the one in areas we need. To do this filtering opration we’re using the locators feature of osm2pgsql.
QuadTiles usage
To handle data, we store a tiles table. Buildings and cameras are all associated to a tile. This way, instead of querying all objects we only query those in the tiles covering the object. It is very usefull for buildings in order to save computation time for focus of cameras, because we filter the objects before doing any geospatial query.
We use the QuadTiles system. To avoid having millions of tiles, the system used is an adaptative grid that covers desertic areas (oceans, forest, etc.) with large tiles while urban areas with a lot of buildings are using small tiles. In total the world has been splitted into 101 191 squares covering the entire planet.
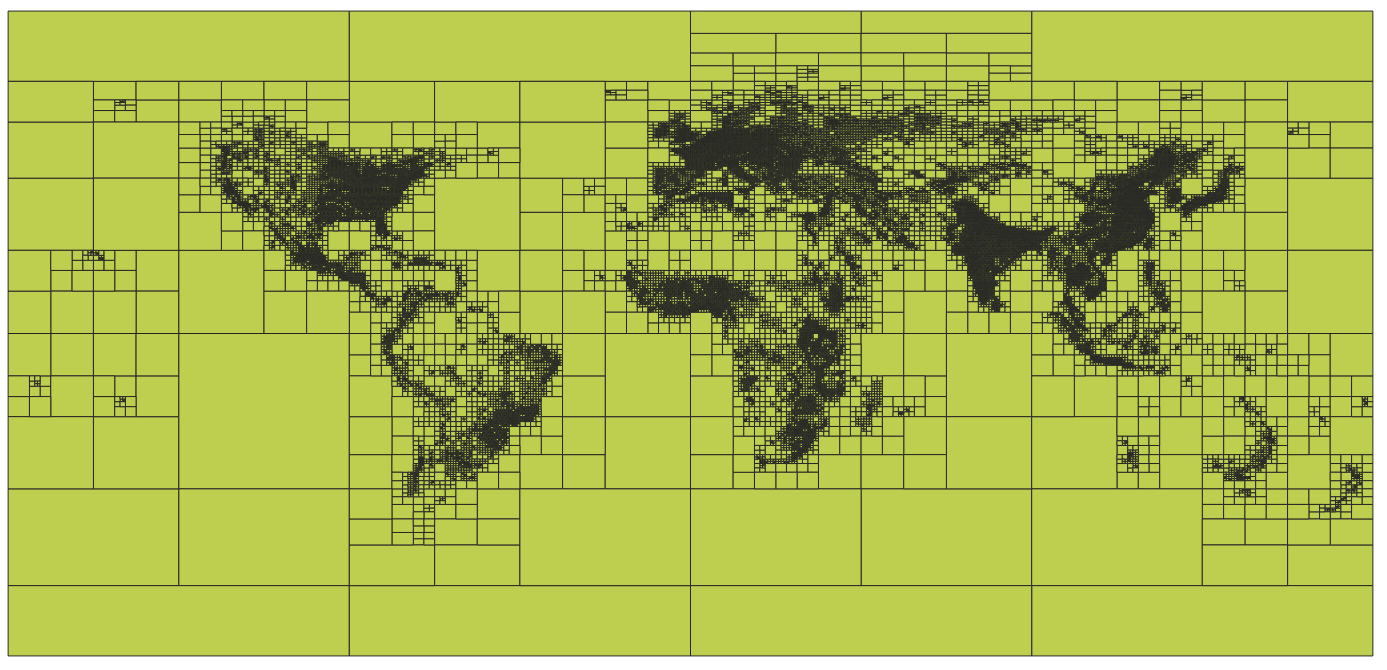 Visualization of the created and imported tiles in QGis
The generated tiles used in this project had been computed using the GHS-BUILT-S dataset representing the built up surface in a grid where 1 pixel = 1 square kilometer. This is an open an free dataset created by the European Union (source).
To transform this dataset into tiles, multiple steps were involved including: transforming the dataset to a gpkg containing the tiles; importing the gpkg into the database; creating a dump of the database to version with the code and compress it.
You don’t need to adapt the QuadTiles used for your project. Except if you are really looking to optimize your database and then it might be interesting to generate a Tile table covering only your area, but it is probably not worth the effort.
- Download the dataset from the official site. You can choose between different years and projections. The current setup is done with the 2030 scenario in the 4326 projection (
GHS_BUILT_S_E2030_GLOBE_R2023A_4326_30ss). - Transform the dataset into a quadtiles gpkg. You can use the following script and adapt it depending on the number of tiles or the max zoom level you want. Be aware that when computing field of view for cameras, only the buildings from the camera tiles and it’s 8 neighbourgs will be retrieve from the database. So if you choose too small tiles it might not work well with very long focus, but it might speed up the process.
generate_quadkey_grid.py
import heapq

import click
import geopandas as gpd
import mercantile
import numpy as np
import rasterio
import rasterio.features
import rasterio.mask
import rasterio.windows
from pyproj import Transformer
from shapely.geometry import box, mapping, shape
from shapely.ops import transform
from tqdm import tqdm


def get_tile_geometry(tile):
    """
    Returns a Shapely Polygon for a given Mercantile Tile.
    Mercantile returns GeoJSON feature dicts, we convert to Shapely.
    """
    # mercantile.feature returns a GeoJSON dictionary in WGS84 (Lon, Lat)
    feature = mercantile.feature(tile)
    return shape(feature['geometry'])


def calculate_weight(tile, raster_src, transformer_to_raster):
    """
    Calculates the 'weight' (sum of pixel values) within a Quadkey tile.
    """
    # 1. Get Geometry in Lat/Lon (WGS84)
    geo_polygon = get_tile_geometry(tile)

    # 2. Transform to Raster CRS
    # GHS raster is likely Mollweide or similar, while Quadkeys are defined in Mercator/WGS84.
    # We must project the tile polygon to match the raster.
    def project(x, y):
        return transformer_to_raster.transform(x, y)

    raster_polygon = transform(project, geo_polygon)

    # 3. Get Bounding Box to read only necessary window
    minx, miny, maxx, maxy = raster_polygon.bounds

    # Create a Window object
    window = rasterio.windows.from_bounds(
        minx, miny, maxx, maxy, transform=raster_src.transform)

    # Expand window slightly to avoid edge rounding errors
    window = window.round_offsets().round_lengths(op='ceil', pixel_precision=0)

    # Handle edge cases where window is outside raster bounds
    try:
        data = raster_src.read(1, window=window)
        win_transform = raster_src.window_transform(window)
    except Exception:
        return 0.0

    if data.size == 0:
        return 0.0

    # 4. Masking
    # Even though Quadkeys are squares, when projected to the Raster CRS (e.g. Mollweide),
    # they might appear rotated or curved. We use geometry_mask to be precise.
    geom_mask = rasterio.features.geometry_mask(
        [raster_polygon],
        out_shape=data.shape,
        transform=win_transform,
        invert=True
    )

    # Sum values
    if raster_src.nodata is not None:
        valid_data = np.ma.masked_equal(data, raster_src.nodata)
        weight = np.sum(valid_data * geom_mask)
    else:
        weight = np.sum(data * geom_mask)

    return float(weight)


@click.command()
@click.argument('input_tiff', type=click.Path(exists=True))
@click.argument('num_tiles', type=int)
@click.option('--output', '-o', default='adaptive_quadkey.gpkg', help='Output GeoPackage filename')
@click.option('--max_zoom', default=13, help='Maximum zoom level (depth) to prevent infinite loops.')
def main(input_tiff, num_tiles, output, max_zoom):
    """
    Generates an adaptive Quadkey grid based on GHS-BUILT-S density.
    """

    print(f"Opening raster: {input_tiff}")

    with rasterio.open(input_tiff) as src:

        # Prepare coordinate transformer (Lat/Lon -> Raster CRS)
        # Mercantile features are WGS84 (EPSG:4326)
        crs_src = "EPSG:4326"
        crs_dst = src.crs
        transformer = Transformer.from_crs(crs_src, crs_dst, always_xy=True)

        print("Initializing Base Grid (Zoom Level 1)...")
        # We start at zoom 1 (4 tiles covering the world) to ensure global coverage.
        # Zoom 0 is just 1 tile, which works, but starting at 1 is usually safer for logic.
        base_tiles = list(mercantile.tiles(-180, -85, 180, 85, [1]))

        # Priority queue: (-weight, tile)
        # Tile objects are comparable in Python, so we can store them directly.
        pq = []

        print(f"Calculating weights for {len(base_tiles)} base tiles...")
        for tile in tqdm(base_tiles, unit="tile"):
            w = calculate_weight(tile, src, transformer)
            heapq.heappush(pq, (-w, tile))

        current_tile_count = len(pq)

        print(f"Starting adaptive splitting. Target: {num_tiles} tiles.")

        # Progress bar setup
        pbar = tqdm(total=num_tiles, initial=current_tile_count, unit="tiles")

        while current_tile_count < num_tiles:
            # 1. Pop the heaviest tile
            neg_weight, tile = heapq.heappop(pq)
            weight = -neg_weight

            # Stop criteria:
            # 1. Tile has 0 buildings (no need to optimize ocean)
            # 2. Max zoom reached (pixels are too small to matter)
            if weight == 0 or tile.z >= max_zoom:
                # Push back and stop splitting this specific branch
                # We add a small offset to weight to ensure it doesn't get picked again immediately
                # if we are forced to iterate (though with weight 0 it stays at bottom)
                heapq.heappush(pq, (neg_weight, tile))

                # If the top of the heap is stuck (everything remaining is max zoom or empty), we break
                if tile.z >= max_zoom and weight > 0:
                    # Check next
                    if not pq:
                        break
                    next_w, next_t = pq[0]
                    if -next_w == 0 or next_t.z >= max_zoom:
                        print("Optimization limit reached (Max Zoom or Empty Areas).")
                        break
                    continue

                # If we just popped an empty tile, and we need more tiles,
                # strictly speaking, we could break, or split empty tiles just to fill the count.
                # Here we choose to stop optimization if only empty tiles are left.
                if weight == 0:
                    # Check if there are any non-zero tiles left in queue
                    # (This is an O(N) check, ideally we trust the heap order)
                    # Since it's a heap, if we popped a 0, everything else is 0.
                    print("All remaining areas are empty. Stopping.")
                    break

            # 2. Split into children (Quadkeys split into 4)
            children = mercantile.children(tile)

            # 3. Calculate weights for children
            for child in children:
                cw = calculate_weight(child, src, transformer)
                heapq.heappush(pq, (-cw, child))

            # Update counts: Remove 1 parent, add 4 children = +3 net change
            current_tile_count += 3
            pbar.update(3)

        pbar.close()

        # Collect results
        print("Constructing GeoDataFrame...")
        final_tiles = [item[1] for item in pq]
        final_weights = [-item[0] for item in pq]
        final_quadkeys = [mercantile.quadkey(t) for t in final_tiles]
        final_zooms = [t.z for t in final_tiles]

        geoms = [get_tile_geometry(t) for t in final_tiles]

        gdf = gpd.GeoDataFrame(
            {
                'quadkey': final_quadkeys,
                'zoom': final_zooms,
                'built_score': final_weights
            },
            geometry=geoms,
            crs="EPSG:4326"
        )

        print(f"Saving to {output}...")
        gdf.to_file(output, driver="GPKG")
        print("Done!")


if __name__ == '__main__':
    main()
- If you want you can edit your geopackage using a GIS software like Qgis
- Using a Django command, we load the tiles into our database. Place this file into the
/backend/cameras/management/commands/folder and execute it usingdocker compose run --rm web ./manage.py load_tiles <my_file>.
load_tiles.py (you might need to add dependencies to your requirements.txt to execute this code)
import os

import geopandas as gpd
from cameras.models import Tile
from django.contrib.gis.geos import GEOSGeometry
from django.core.management.base import BaseCommand, CommandError
from tqdm import tqdm


class Command(BaseCommand):
    help = 'Imports a GeoPackage of Quadkey tiles into the Tile model'

    def add_arguments(self, parser):
        parser.add_argument('gpkg_file', type=str,
                            help='Path to the .gpkg file')
        parser.add_argument(
            '--clear',
            action='store_true',
            help='Delete existing tiles before importing',
        )

    def handle(self, *args, **options):
        file_path = options['gpkg_file']

        if not os.path.exists(file_path):
            raise CommandError(f'File "{file_path}" does not exist')

        # 1. Read the GeoPackage using GeoPandas
        self.stdout.write(f"Reading {file_path}...")
        try:
            gdf = gpd.read_file(file_path)
        except Exception as e:
            raise CommandError(f"Error reading GPKG: {e}")

        # 2. Clear existing data if requested
        if options['clear']:
            self.stdout.write("Clearing existing tiles...")
            Tile.objects.all().delete()

        # 3. Prepare objects for Bulk Insert
        tiles_to_create = []
        batch_size = 5000

        self.stdout.write(f"Processing {len(gdf)} rows...")

        for index, row in tqdm(gdf.iterrows(), total=gdf.shape[0]):

            # Quadkey script output
            t_id = row['quadkey']
            t_level = row['zoom']

            # Check ID length constraint (Model defines max_length=15)
            if len(str(t_id)) > 15:
                self.stdout.write(self.style.WARNING(
                    f"Skipping ID {t_id}: Length > 15"))
                continue

            # Convert Shapely geometry (GeoPandas) to Django GEOSGeometry
            # We use .wkt (Well Known Text) as the bridge
            poly_wkt = row.geometry.wkt

            tile = Tile(
                id=str(t_id),
                level=t_level,
                geom=GEOSGeometry(poly_wkt, srid=4326)
            )
            tiles_to_create.append(tile)

            # Batch Insert to keep memory usage low
            if len(tiles_to_create) >= batch_size:
                self._bulk_save(tiles_to_create)
                tiles_to_create = []

        # Insert remaining tiles
        if tiles_to_create:
            self._bulk_save(tiles_to_create)

        self.stdout.write(f'Successfully imported tiles from {file_path}')

    def _bulk_save(self, object_list):
        """Helper to perform bulk create"""
        Tile.objects.bulk_create(object_list, ignore_conflicts=True)
- That’s it, it’s over !
- If you want to backup your db to replicate it and replace the default dump given in this project, you can run this command:
docker compose run --rm postgis pg_dump -U $POSTGRES_USER -d $POSTGRES_DB -p 5432 -h postgis --table=cameras_tile --data-only --no-owner --no-privileges | gzip > <name_of_your_file.sql.gz>
When loading the buildings from the osm.pbf datasource file to the database, we’re using the locators feature of osm2pgsql to match any building with it’s corresponding tile.
Import time and database size
Database size: what you should expect
| Original file size (.osm.pbf) | Number of buildings in original file | Number of buildings in final DB | Number of cameras imported | DB size |
|---|---|---|---|---|
haute_garonne.osm.pbf ~ 111 Mo | ??? | 353 741 | 2377 | 505 Mo |
france.osm.pbf ~ 5.6 Go | ~50 millions | ~14 millions | 69 053 | 5.8 Go |
When handling large PBF files, you should expect to get in the end a database the size of your original PBF file. It is of course depending of your area specificities (number of buildings / cameras / repartition).
Computation time for the install procedure
| Machine used | Original file | Computation time for cameras only | Computation time total |
|---|---|---|---|
| 2015 computer. 8 cores. 32 Gb ram. | haute_garonne.osm.pbf ~ 111 Mo | 2m46s | 3m40s |
| 2024 computer. 16 cores. 32 Gb ram. | haute_garonne.osm.pbf ~ 111 Mo | 42s | 1m13s |
| 2015 computer. 8 cores. 32 Gb ram. | france.osm.pbf ~ 5.6 Go | 53m | 1h18m |
| 2024 computer. 16 cores. 32 Gb ram. | france.osm.pbf ~ 5.6 Go | 13m12s | 26m02s |
| 2024 computer. 16 cores. 32 Gb ram. | planet.osm.pbf ~ 90 Go | 37m | 3h20m |
When dealing with a large file like the entire planet the most time consuming step is the import of the buildings in the database made by osm2pgsql. The RAM on your machine will make a huge difference as it is recommanded to have at least as many RAM as the file size imported.